Guide to FOSS Graphic Design Tools Part 4: Scribus

Scribus logoCreating great vectors and editing raster images are essential, but graphic design usually requires the added steps of putting them together into a layout. For print, we’d usually use something like Adobe InDesign, that’s made for placing images and text just so and preparing the files for printers. If you’re looking for a FOSS tool, the only tool that’s really worth mentioning is Scribus. Here are a few examples of items made with Scribus.

Resources

Installation – If you’re unaccustomed to open source projects, installation is usually not a one-click deal. Scribus, like many open source tools, sends you to a page of many links and options. Start on the Scribus site and you’ll want to download the stable branch, unless you’re interested in developing or in previewing the next release. Then you’ll need to pick from the correct download for the various operating systems. Because Linux has many distributions (aka modified versions), there appear to be many options, but PC and Mac are listed first thankfully!

Important for Mac users: You’ll need to install Ghostscript first, so read the documentation on installation for Mac.

Tutorials – Heres’s a pretty popular set of Scribus video tutorials to start you off. Mahalo to Kevin Pugh for putting them together. The Scribus user manual is wordy but provides a wealth of information.

Interface

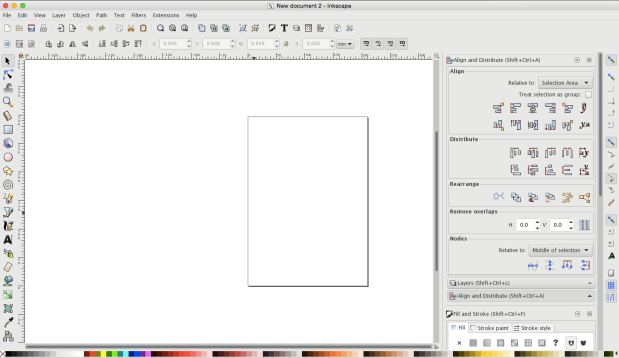
Compared to InDesign, Scribus has a clean but slightly dated look. You’re greeted with the New Document window, which has all the same controls you get in InDesign, except for the ability to add columns. (You can add vertical and horizonal guides under Page > Manage Guides.) See the two below:

InDesign's new document screenshot.

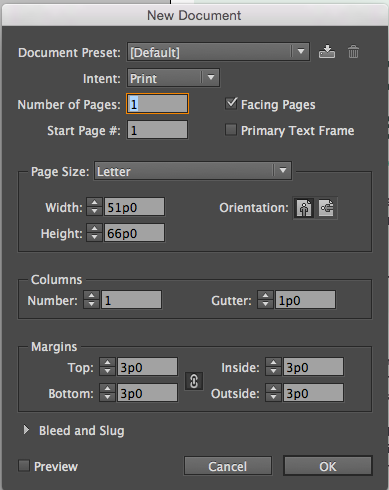
InDesign’s new document window

Scribus new document screenshot

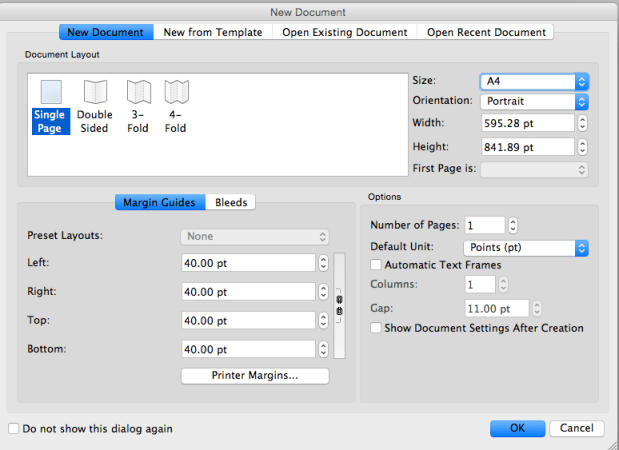
Scribus’ new document window.

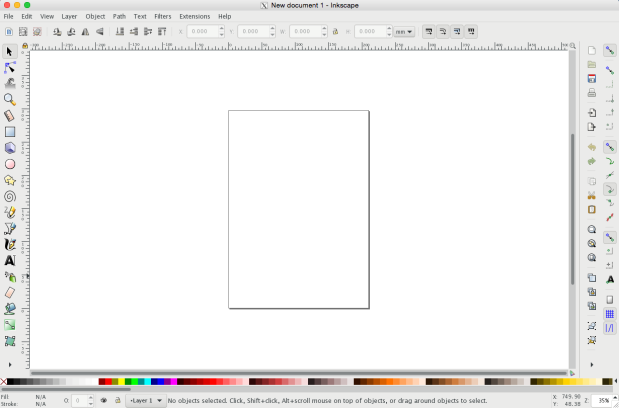
The rest of the interface is pretty standard, similar in feel to Inkscape and GIMP. In Scribus, you can split up the icons into groups on the toolbar by dragging icons to create space between groups, see Kevin Pugh’s tutorial cued up. Again no palettes are open by default, so you’ll need to go in and open them up. These palettes are located under the “Window” menu, which is a good name for them because they don’t dock.

Tool bar grouping screenshot

Drag tools to create groupings

Scribus screenshot

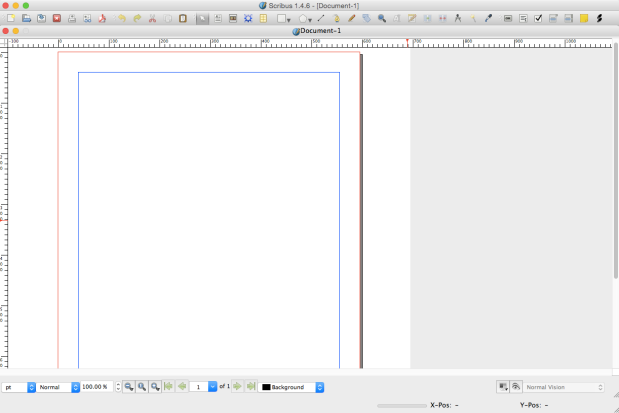
Interface looks more simple than InDesign’s

Interface with palettes, screenshot

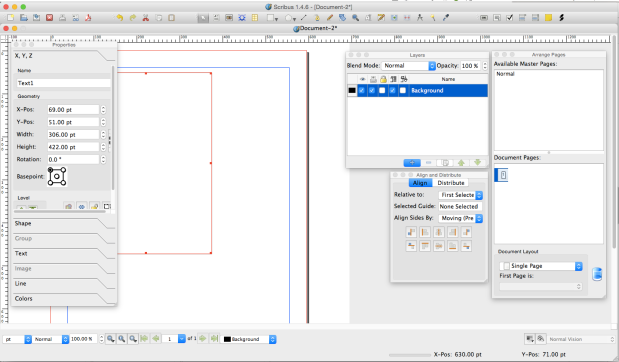
With palettes open, (Layers, Pages, Properties & Align) found under “Windows” menu. Palettes don’t dock.
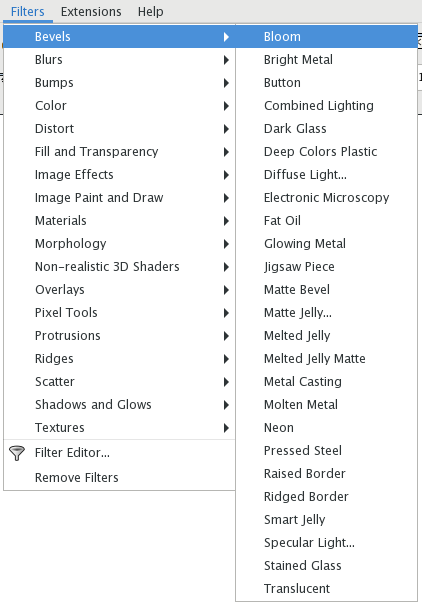
Menu

Scribus’ menu and submenu feels disorienting, compared to InDesign.

  • The Item menu does loosely align to “Object.”
  • Insert is a way to insert items like shapes and textboxes, but InDesign you’d rely on the toolbars for this.
  • Page loosely aligns to “Layout”
  • InDesign has the table menu, a new feature set that Scribus doesn’t have (yet?). See Tables section below.
Scribus menu screenshot

Scribus’ menu

InDesign's menu screenshot

InDesign’s menu

Working with Text

This is where Scribus feels very different from InDesign. Thus, Scribus separates working with text and images, while InDesign allows you to place either text or image. Scribus’ wiki on “Working with Text” is a must-read.

  1. Scribus actually recommends using what’s called the “Story Editor” to import content, which is a separate WYSIWYG window for editing the content. According to their wiki, they say this is useful for editing the text directly, especially for long passages that may be linked through the document. I can actually see their point on this.
  2. Scribus doesn’t support placing .DOCX files, but it does have support for .DOC which requires an extra step.
  3. Scribus supports a number of other files types, mostly open standards, such as .ODT (LibreOffice) and .txt (text file). This means you’ll likely need to find an open standard doc type to save to, that will import cleanly.
Story Editor screenshot

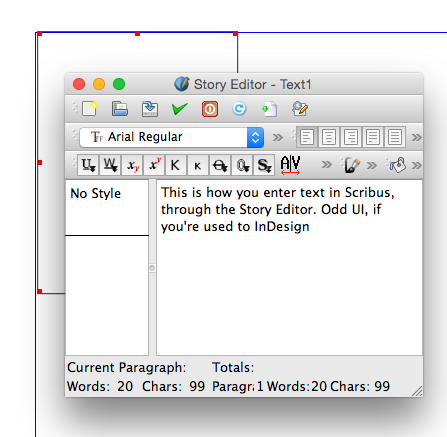
Strange UI, if you’re used to InDesign. However, it can be useful to edit long or linked blocks of text.

Tables

A notable missing feature in Scribus is the ability to do tables. The InDesign feature is quite robust allow you to design a custom table, including alternating row stroke/background color. Scribus’ wiki purports to have a table workaround, but it is basically creating a table from text boxes & shapes.

InDesign Table options

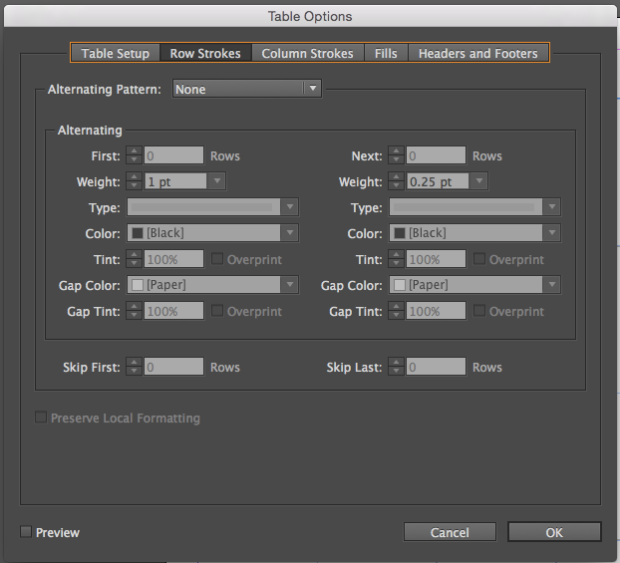
InDesign’s Table Options feature! Pretty slick! You won’t find this in Scribus yet, but you can build it the old-fashioned way, of course.

Compatibility

This is where Scribus has fallen short the most for me. According to this article by Techwalla, Scribus can import EPS files, exported out of InDesign. I have tried this and it hasn’t worked for me after multiple attempts and troubleshooting. There is a potential fix listed on this thread by mnawj, but the tool “Gsview” is only available on Windows so I couldn’t replicate the fix on my mac.

Adobe’s file formats are proprietary and they haven’t release the .INDD file type; therefore Scribus developers cannot program an import script. The issue is a prime example of why FOSS tools are advantageous. An open standard will not lock you into a particular tool or company. One lesser option is to edit the .EPS files in Inkscape as vectors. I was able to import an .EPS created in InDesign and edit it in Inkscape successfully.

Although file compatibility is a pain, it’s still worth considering a move to Scribus to take advantage of the no-cost, open standard file format option moving forward. Having files in Scribus’ .SLA format, you could even hire a programmer one day to open and convert your files, if Scribus went belly-up! I don’t see Adobe going away any time soon, but their subscription model will keep us paying them indefinitely!

Keyboard shortcuts, of course important to us designers, are not the same as InDesign. However, there is similarity with Inkscape and GIMP. Scribus does have support for the Apple/Command key (unlike Inkscape). You can also edit the keyboard shortcuts, as noted in the Scribus wiki.

Performance

I haven’t found any performance issues using Scribus! As I’ve mentioned on posts about GIMP and Inkscape, the tools don’t have Finder integration. Therefore, when you open a file, you get a Scribus “finder” window. The Scribus finder window doesn’t do search natively, so you really need to know where you’re file is or at least be able to navigate through your folder structure. Things like this can slow down your workflow, but definitely not a dealbreaker and may help you to become more organized with your files.

Open window screenshot

Scribus’ open window, doesn’t have the same features of Mac’s “Finder,” most notably Search.

Short of Professional, but Worthy Contender

Scribus seems a hair less polished than Inkscape and GIMP, but it is still an fine, more than adequate FOSS tool! I hesitate to recommend Scribus for professionals especially if you collaborate on designs with others and need to be able to import/edit InDesign files. If you work with large books or longer text files, it will be a pain to deal with in Inkscape and you’ll want something like InDesign.

However, if you don’t use InDesign much or work mostly on one-page posters, flyers and such that can be edited in Inkscape as an .EPS, it’s something you should consider.

This being said, I recommend keeping an eye out for future versions of Scribus or getting involved in the Scribus community to help shape future features. Scribus developers may just add the tools and features that would make it worth switching!

Review past part of the guide: Why FOSS?, Gimp, Inkscape

Guide to FOSS Graphic Design Tools, Part 3: Inkscape

inkscape_logoIn looking for a vector tool to rival Illustrator, I found that the most recommended tool was Inkscape. This thread on DesignContest also has a lot of good information, pros/cons of the two tools and the designers on the thread generally find Inkscape can do most of what they need!

Resources

IMPORTANT for Mac users: You must read this surprisingly good documentation on installing Inkscape before getting started. Installation is NOT straightforward. Inkscape runs on a separate program called XQuartz, and it’s ideal to install it first.

Quick start tutorial: great video tutorial by Derek Banas. He also has additional videos that delve further into specific tools and topics.

I’ll summarize some of the points of interest comparing Illustrator and Inkscape that may be helpful for designers below:

Interface

When you first get Inkscape started, you may notice it’s a refreshingly clean, bright interface. I’ve been using the latest Creative Suite/Cloud for so long, which everything has gone to a dark gray/black background. In Inkscape, more of the tools are also docked all around the screen, as opposed to on different palettes or menus. (There ARE palettes that you’ll need to open up. Plus tool options on the top, similar to Illustrator.) Included in this, are also the color swatches at the bottom of the screen. If you have a large monitor, you will see lots of the color choices to choose from. They also make a nice visual, too.

inkscape screenshot

Default view when you start Inkscape, notice all the items docked instead of on palettes. You have lots of working area. This is the view on my 24″ external monitor.

Small screen tool bar screenshot

On a small screen, the farthest toolbar to the right will move to the top. This is what happened on my 13″ mac.

Menus

Inkscape menu screenshot

Inkscape’s Menu,  note the menu similarities/differences compared to Illustrator’s below.

Illustrator's menu screenshot

Illustrator’s menu

Inkscape and Illustrator have alot of similarities in their Menus, here are some things to note:

  • Inkscape brings out “Layer” and “Path” to the top level menu. Illustrator folks will be used to dealing with Layers via the Layers palette, but it basically doesn’t the same things. Path is similar to the Pathfinder palette.
  • Inkscape has a TON of filters and extensions, most of which I don’t use. The array at least appears to rival Illustrator. Here is a filter guide, using an older version of Inkscape, but could prove useful.
Filters menu screenshot

Filters > Bevels menu alone provides a ton of effects.

Document Preferences

Screen Shot 2017-12-04 at 4.05.53 PM

You can also get to Document Set Up via a little tool icon at the bottom of the 2nd tool bar from the right or under the main menu (depending on screen size). As you can see, like GIMP, Inkscape provides good descriptive tooltips.

Palettes

Palettes you may want to open up, per Derek Banas’ video, referenced above. This will make Inkscape feel a little more like Illustrator. These buttons are located on the farthest right toolbar or under the main menu.

Toolbar screenshot

  • Fill & Stroke
  • Text
  • Layers
  • Align
Docked palettes screenshot

The palettes dock to the right, similar to older versions of Illustrator.

Tools

Node tool screenshot

Node tool – think node in Inkscape, versus anchor.

Most of the tool icons are very similar or easily understood even if they’re different from Illustrator. For instance, Illustrator has a Direct Selection tool (A), whereas Inkscape has a Node tool (N). Inkscape seems to provide more tools and tool options as part of the user interface, whereas in Illustrator some of these functions require advanced knowledge or even knowledge of keyboard shortcuts. Here are a few notable examples:

Duplicate – most Illustrator users will know Alt/Option + Select/drag to duplicate something, but users wouldn’t find it in the interface. Inkscape has it in the Edit menu or CTRL D.

Zoom tools screenshot

Here are a couple additional zoom tools, not found readily in Illustrator.

Zoom to selection and drawing (2nd toolbar from the right or under menu): zoom to selection seems to be a new feature in the latest version on Illustrator, but Inkscape has it natively in the toolbar, along with Zoom to drawing.

Incremental Object Creation – this is a cool feature that co-opts the CTRL key that would normally be used in Illustrator to bring up a context menu. The incremental object creation allows you to create an object, say a rectangle, in increments of whole numbers, e.g. 1:1. 1:2. See Derek Banas’ video, cued up to demo this.

Circles/Arcs, Polygon, Star tools – there are nice, intuitive tool options for these tools that allow you to make modifications that would take multiple steps in Illustrator. For instance, here’s an Illustrator tutorial on making a circle with a wedge. Inkscape provides the arc and segment buttons, as a tool option so you can choose to edit a circle with a wedge more easily.

Circle wedge screenshot

You can easily make this wedge by selecting “Switch to segment” and moving the anchor/node.

Windows

When you have multiple files open, the windows don’t tab like they do in Adobe CC. You’ll need to use the “Window” menu to navigate to your desired file.

Tabbed windows screenshot

Not a deal breaker but something to note about Inkscape: no tabbed windows.

Compatibility

Thankfully Inkscape imports native .AI files! The native file format for Inkscape is .SVG, which is an open standard file format. (Supporting open standards are another way to participate in the ideals of Free & open source software.) The .SVG files can also be brought into Illustrator.

Keyboard shortcuts are very different, as they are in GIMP and Scribus. Thankfully there is a way to modify the keyboard shortcuts in Inkscape.

One strange thing to note for Mac Users: Inkscape .92 does NOT support the Apple/Command key for keyboard shortcuts. So you’ll need to use Control instead.

Performance

I’ve notice some slight artifacts when resizing shapes, but overall, there was very little lacking in this powerful, free tool!

As I’ve mentioned on my GIMP post, the tools don’t have Finder integration. Therefore, when you open a file, you get a Inkscape “finder” window, which doesn’t provide a Search feature.

Different but Similar where it Counts

In contrast to GIMP where the tools operated so closely to Photoshop, Inkscape operates differently than Illustrator, but the same concepts are used to edit vectors. Digital illustration starts with creating vectors either free form, text or through a variety of shapes, and modifying them through additional tools. Some things are very similar because they are seminal concepts, like those in Illustrator’s Pathfinder and Inkscape’s “Path” menu.

Pathfinder palette screenshot

Illustrator uses the same concepts as Inkscape

Path menu

Inkscape’s tools under the Path menu

Skim this 15 min video tutorial that demonstrates lots of familiar techniques, just using Inkscape tools (and who wouldn’t want to make a yummy-looking donut?):

As you can see, an Illustrator user will be a quick study of Inkscape, albeit with some learning curve for installation, modifying keyboard shortcuts and getting used to using the Control key instead of Command (for Apple users). Kudos to the developers for a tool that no only rivals Illustrator, it provides some unique value!

Ready for the next FOSS tool, Scribus?

Or go back to Why FOSS? or Gimp

Guide to FOSS Graphic Design Tools, Part 1: Why Free & Open Source?

Before I took a class on Free & Open Source software (FOSS), I had no inclination whatsoever to switch tools or consider FOSS options. I am a designer, using a mac and typical Adobe and Google tools mostly. I value what works and helps me be efficient!

Although I never examined the tools in this 4-part guide prior to this class, I assumed the quality would be horrible. I imagined “dumbed-down” tools, like a toy version of the real thing. I couldn’t have been more wrong!

You’ll see how powerful the tools are in this guide, but there’s something that I’d also like you to at least be exposed to: the question of WHY? It’s an important question because although powerful, these tools are not without their hiccups and challenges. If you understand a bit about the values of FOSS, you may find that your values align, you may be willing to find workarounds for the hiccups and you may even find a new level of satisfaction in being part of these FOSS communities.

Think: Crowdsourced Software

Although I value my toolsets, I realize now that there is a larger context to software that I didn’t understand. Most of us see software as products that we buy, but people in the FOSS community see them as projects where they are building them for themselves and others to benefit from. Similar to crowdsourcing & crowdfunding, the more people who use and contribute, the more robust and usable these products are and the more people can benefit from them.

The things I’ve learned and I hope you’ll see in this guide is that these tools are extremely close to being ready for professional use, if not already there! This guide will cover 3 tools: GIMP, Inkscape & Scribus (Adobe alternatives are Photoshop, Illustrator and InDesign, respectively).

I contend that if all designers and developers currently using Adobe CC switched to these FOSS tools and contributed 8 hours each month for a year, then from here on out, we would have a FREE killer set of tools, maybe even better than Adobe CC. I argue these tools mostly need a slicker UI and possibly a few new features. Imagine never paying for Adobe CC again (now $50/month), and providing a free tool to all people around the world regardless of their socio-economic background? Imagine how this could transform schools and other institutions that deal with limited budgets?

Free as-in-Speech, but also as-in-Beer

The Free Software movement is mostly NOT about cost, but about the importance of having software be open and free to use and share without restrictions. Proprietary tools like Adobe’s do not fall within these ideals. Richard Stallman, founder of the movement, imagined unlimited progress and transparency if software code was kept free and open to all. Think of how access to our country’s laws and the documentation to understand them are open to us all? What would it be like if they were not?

A scary thought to consider in favor of Free software: imagine powerful AI (artificial intelligence) software that is proprietary, would you want one or a few companies having that much power without access to their code?

The FOSS titles in this guide also use open standards. Open standards are file formats that are similarly non-proprietary so software programs can save, import/open and edit these files. Adobe’s .INDD is a good example of a file format that is proprietary and therefore doesn’t import into Scribus. As long as .INDD is proprietary and Adobe doesn’t release the code, we’ll need Adobe InDesign (and will need to pay for it) to open and edit these files.

With Adobe moving to a subscription model, will all of our files become worthless once we stop paying? The good news is that GIMP and Inkscape can import native .PSD and .AI files!

Free AND Good? Does Not Compute!

As a Business major myself, I don’t intend to vilify Adobe in this guide. I understand that one of the most important reasons why proprietary tools exist is to create the most value for people, which often takes the form of a for-profit business! At the same time, there is a surprising phenomenon in which thousands of people are contributing to open source software without direct monetary compensation! On the surface, this doesn’t make sense!

However, Dan Pink’s video, Drive: The Surprising Truth About What Motivates Us, explains what research has to say. Basically, once you get past tasks that only require “rudimentary skill,” greater monetary reward doesn’t lead to increased performance. For higher order tasks, people are motivated by other intangibles: autonomy, mastery and sense of purpose. I contend most designers would be excited by work that met this criteria!

Almost There!

Try it Out


Keep Calm

There will be hiccups, especially during installation but read the documentation I’ve provided!

Take a good look at the tools in this guide, install them and use them! They’re free for heaven’s sake! Breathe, read the documentation and stay calm when installing and using these for the first time. Try doing things you would normally do in Adobe’s tools, or recreate something you did in an Adobe tool. There will be differences that you’ll need to get used to, but alot of things will be intuitive as well!

Consider Contributing

As a designer, I value the extra “10-20%” that most of the world may miss and not even be able to appreciate. The perfect font pairing, moving something an extra pixel to the left or right, an interesting take on the grid, etc. I believe this is what FOSS tools are missing, the final 10-20% that often gets cut due to budgets or time. As designers, we have the attention to detail (read: anal) that can help provide useful feedback to developers and the ability to help design better UI and graphics. You don’t need to be a programmer to be involved in the FOSS communities. Remember that we are all invited to contribute! Here’s a guide to getting starting with contributing.

Ready for the first FOSS tool, GIMP?

Or jump to Inkscape or Scribus

Guide to FOSS Graphic Design Tools, Part 2: GIMP

I have heard good things about GIMP over the last few years, mostly that it’s full-featured enough for most photographic image editing. Since I have access to Photoshop (PS), I’ve never needed to use it. From my initial analysis, it is a FOSS gem with tons of key functionality and an unbeatable price (free)!

When I think of a free image editing tool, I am reminded of early versions of “Microsoft Draw” with very simplistic tools and features. GIMP is not that, thankfully, and is really robust for being a tool supported mostly by volunteers! Even professional photographers are moving over to GIMP, as seen in this post by Riley Brandt. This is why GIMP is the subject of Part 1 (of 3) in my Guide to FOSS Graphic Design Tools!

I’m not a professional photographer or PS expert, but I have been using it for years mostly to prep photos for print and the web. I’m just getting to know GIMP, so this guide will hopefully be a good starting point to help you navigate around quickly and learn more about the tools for yourself.

Good for Fun & More

My first foray into using GIMP came as a required exercise in my FOSS class transforming a photo of myself wielding a stick, into one of me holding a jedi lightsaber! Here’s the video tutorial.

NOTE: I had trouble with the exact steps used in the video, but as a PS user, I knew there were multiple ways of doing things! For me, the color balance of the glow layer didn’t work, so I used “Colorify” instead. I then moved the blade layer above the glow layers.

GIMP colorify tool

I used Colorify and moved Blade 1 layer to the top. You can see my lightsaber there in the background! Easily done in GIMP!

This worked so well that my husband asked that I take a family photo and give us all lightsabers! From this little exercise, I thought, okay, it has alot of what I’m familiar with and produced a product that people probably thought was done in Photoshop.

Interface & Tools

Compared to Photoshop Creative Cloud, GIMP’s interface looks like a throwback to earlier times (which seems to be the case with lots of FOSS tools), but it’s familiar to those who’ve used Adobe products. There is a menu at the top, panes with tools, including the toolbar on the left and the layers pane to the right.

Screenshot of GIMP interface

I actually like that the tool options show up right below the selected tool on the toolbar.

The toolbar is pretty similar in content to Photoshop, although in different order/configuration, with some differences of note:

Toolbox screenshot

GIMP’s toolbox

  • The arrow/move tool is not at the top left, it’s in the second row at the end. I notice this because that tool is my go-to and wonder why the rectangle tool has the prime real estate!
  • Tool options show up in the pane below, which is actually kind of nice! PS brings up the context menu at the top, which feels more removed from the tools IMO.
  • Tooltips – rollover each tool icon and the name, short description and shortcut comes up. Nice feature, especially for beginners and those who are used to PS. You may not recognize the tool by the icon, but alot of the functionality is there!

GIMP’s Tool differences:

  • Lasso Tool: Photoshop has 3 main variations (lasso, polygonal, magnetic). GIMP seems to combine the free form and polygonal through the use of the shift button! I actually prefer the GIMP lasso tool, more intuitive and simple to use!
    • Scissors Tool, operates like the Magnetic Lasso tool.
    • Foreground Select Tool, operates similar to the magnetic lasso as well to select a foreground object.
  • Color Select Tool: operates like the Magic Wand tool
  • Apparently missing tools:
    • Quick Selection Wand
    • Custom Shape Selection Tool

Menu Tools:

GIMP Menu Bar Screenshot

GIMP Menu Bar

Photoshop Menu Screenshot

Photoshop Menu Bar

GIMP and PS’s menu bars are similar, with a few differences to note:

  • “Colors” comprise mostly the Image > Adjustment tools under PS’s “Image” such as Color Balance, Hue/Saturation, Invert. This is an important set of tools, I’m glad they brought it out in its menu.
  • “Select” menu deals with selections, feathering/growing etc. that you would find in the Tool Bar Options menu (shows up at the top when a tool is selected)
  • “Tools” is another way to get at the toolbar tools
  • GIMP doesn’t seem to have 3D specific capability, except for 3-D effects like in this tutorial. I assume this is where Blender comes in.

Most of the tools themselves have the same functionality with slightly different interfaces. Here is a side-by-side of dialog boxes for Hue/Saturation.

Windows

When you have multiple files open, the windows don’t tab like they do in Adobe CC. You’ll need to use the “Window” menu to navigate to your desired file.

Tabbed windows photoshop

No tabbed windows in GIMP

Compatibility & Performance

GIMP’s native file format is .xcf, but it opens .psd files just fine. It also exports all the major file formats you’ll need (jpg, gif, png, tiff, eps, etc).

Shortcuts

Unfortunately, GIMP doesn’t use the same shortcuts as PS. A few of them are the same, but most are not! This is a real bummer for those who are used to using PS. Thankfully, Riley Brandt’s blog shares a way to set these to PS shortcuts!

Same examples:

  • Default to Black and White Background/Foreground Color: D
  • Switch Background/Foreground Color: X

Different examples:

  • Eyedropper Tool (I) in PS; Color Picker (O) in GIMP
  • Clone Stamp Tool (S) in PS; Clone Tool (C) in GIMP
  • Crop (C) in PS, Crop (Shift C) in GIMP

Grabbing Items

GIMP selects and grabs items based on what you click on, not necessarily the layer you’re on. In PS, you can only grab something if it’s on the layer you have active. This is a strange phenomenon for those who are used to Photoshop and other Adobe products.

Performance

I did notice some performance issues and general clunkiness with GIMP:

  1. No search when opening files: When opening files in GIMP, the dialog box doesn’t allow you to use search to find a file you’re looking for. You need to know where it is on your machine.
  2. Slower performance with large files: I did the jedi technique on a my family photo in GIMP and PS, to compare. The base image was a 28MB, taken by a professional photographer. With the Blade and Glow layers, it become a 147MB. In GIMP, it took a much longer time for the blurs to render. If I were to work on large files in GIMP, I may downsample them first if I didn’t need them to be large sized.
  3. Screenshot of Gaussian Blur icon

    Tools open a new program icon

    Added program icons: When working with some tools in GIMP, such as Gaussian Blur, the dialog box opens up a separate icon on the computer’s toolbar, as if a new program was open.

Similar Enough

In the case of the Jedi tutorial, I followed the steps on both PS and GIMP, and could do them with similar ease and almost the exact same tools. This speaks to how close the programs are in functionality. Although they differ in interface, the great price point and support for Free software is another payoff to consider.

I strongly recommend trying GIMP for yourself. Don’t let the horrible name get in the way! I’d recommend GIMP for students, budding graphic designers and amateurs, for sure. For professionals, it’s worth checking out and seeing if Adobe’s ongoing licensing costs make sense for you. Because of Adobe licensing, you may not be able to have access to Photoshop on all of our computers or when you’re working on a different computer, so GIMP may save you in a pinch as well.

Ready for the next FOSS tool, Inkscape?

Or go back to Why FOSS? or jump to Scribus